Exporting and Rendering Options in Alight Motion – Complete Guide for High-Quality Video Export (2026)
I still remember the day I lost six hours of editing work because of one bad export. It was a client’s brand intro, due in the morning, and I had spent the whole evening polishing every frame. When I finally tapped export at 11 PM, the app crashed twice, then produced a blurry, pixelated mess that looked nothing like my preview. That night taught me the lesson every mobile editor eventually learns the hard way. The export settings matter just as much as the edit itself.
Most beginners treat exporting as an afterthought. They spend hours on transitions, color grading, and motion design, then click export with default settings and wonder why the final video looks like a YouTube video from 2010. The truth is that even the most beautiful edit can be ruined by the wrong bitrate, codec, or resolution. Once you understand the exporting and rendering options in Alight Motion Mod APK, your videos start looking exactly the way they did in your timeline.
This guide is built from three years of exporting hundreds of client videos, social media reels, AMVs, and YouTube projects from Alight Motion. I will walk you through every export setting, the best configurations for each platform, how to fix common problems, and the pre-export checklist I use before every single render. Whether you are a beginner, a social media editor, or a freelancer delivering paid work, this guide will save you from the kind of disasters I learned from.
What Is Exporting and Rendering in Alight Motion?
Before we touch a single setting, let me clear up what exporting and rendering actually mean. People use these terms interchangeably, but they describe slightly different stages of the same process.
Understanding Video Exporting
Exporting is the act of converting your finished timeline into a final video file. It takes everything you have arranged, every layer, effect, keyframe, and audio track, and bakes it into a single playable file like an MP4. Once exported, the video lives independently of your project and can be shared, uploaded, or saved.
What Rendering Means in Video Editing
Rendering is the calculation process that happens during export. The app processes every frame, applies every effect, blends every layer, and writes the result to your output file. Rendering is what makes exporting take time, especially on complex projects with motion blur, particle effects, or heavy color grading.
Difference Between Exporting and Rendering
Exporting is the overall action. Rendering is the work happening during that action. Think of exporting as ordering a pizza and rendering as the chef actually making it. Both are needed, but they describe different parts of the same job.
How Alight Motion Processes Video Projects?
When you tap export, Alight Motion reads your timeline frame by frame, applies all effects and transformations, encodes the result using your chosen codec, and packages it inside your selected format. The whole process is locked to your settings, which is why those settings deserve careful attention.
Export Options in Alight Motion
Alight Motion offers more export formats than most mobile editors. Here is what each one does and when to use it.
MP4 Video Export
MP4 is your default workhorse. It produces a universal video file that plays on every device and uploads to every platform without issues. For 95 percent of projects, MP4 is the right choice. I use it on every client delivery unless someone specifically requests otherwise.
GIF Export Option
GIF export turns your video into a looping animated image. It is perfect for messaging apps, email signatures, and quick reaction clips. Keep in mind that GIFs have no audio and limited color palettes, so do not use them for anything that needs visual fidelity.
PNG Sequence Export
PNG sequence export saves every frame as a separate transparent image. This is invaluable for animators who want to composite their work in other software, or for creating stickers and overlays with alpha channels intact.
Transparent Background Export
If your project has a transparent background, you can export it with transparency preserved through PNG sequences. This is how I export animated logos for clients who need to layer them over their own footage in different software.
Audio Export Settings
Alight Motion handles audio automatically during MP4 export, but you can also export audio separately. For social platforms, AAC at 128 to 256 kbps is the standard. Higher bitrates improve audio quality but increase file size.
Frame Rate and Resolution Options
Frame rate options usually include 24, 30, and 60 fps. Resolution choices range from 480p up to 4K, depending on your device. Your project’s source settings often dictate the maximum export quality available.
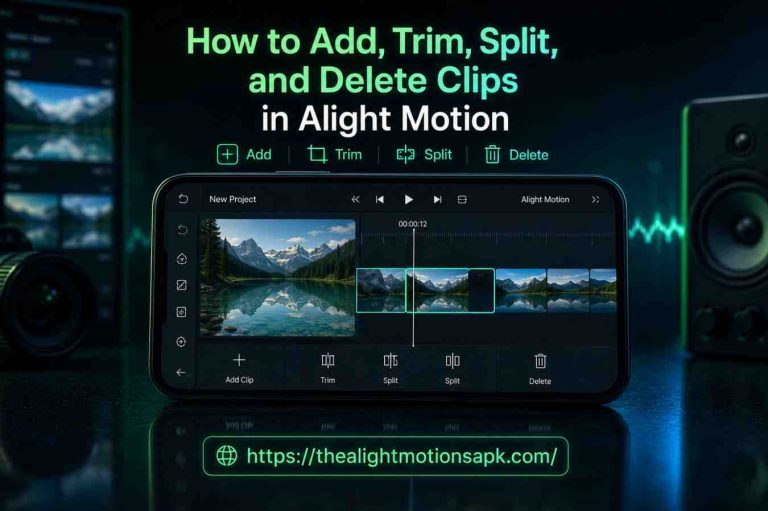
How to Export Videos in Alight Motion? (Step-by-Step)
This is the exact process I follow on every project. Open the app and follow along.
Step 1: Complete Your Editing Project
Make sure every clip, layer, and effect is finalized. Once you tap export, going back to fix things means re-rendering. Save yourself the wait by reviewing your timeline carefully first.
Step 2: Open the Export Menu
Tap the export button, usually shown as an upward arrow icon in the top right corner. The export panel opens with all your output options visible.
Step 3: Choose Video Format
Pick MP4 for general video, GIF for animated images, or PNG sequence for transparent frame-by-frame export. MP4 is the safe default for almost everything.
Step 4: Select Resolution and FPS
Match your resolution to your destination platform. For YouTube, 1080p or 4K. For Reels and Shorts, 1080×1920. Frame rate of 60 fps gives smoother motion, while 30 fps keeps file sizes lower.
Step 5: Adjust Bitrate and Quality Settings
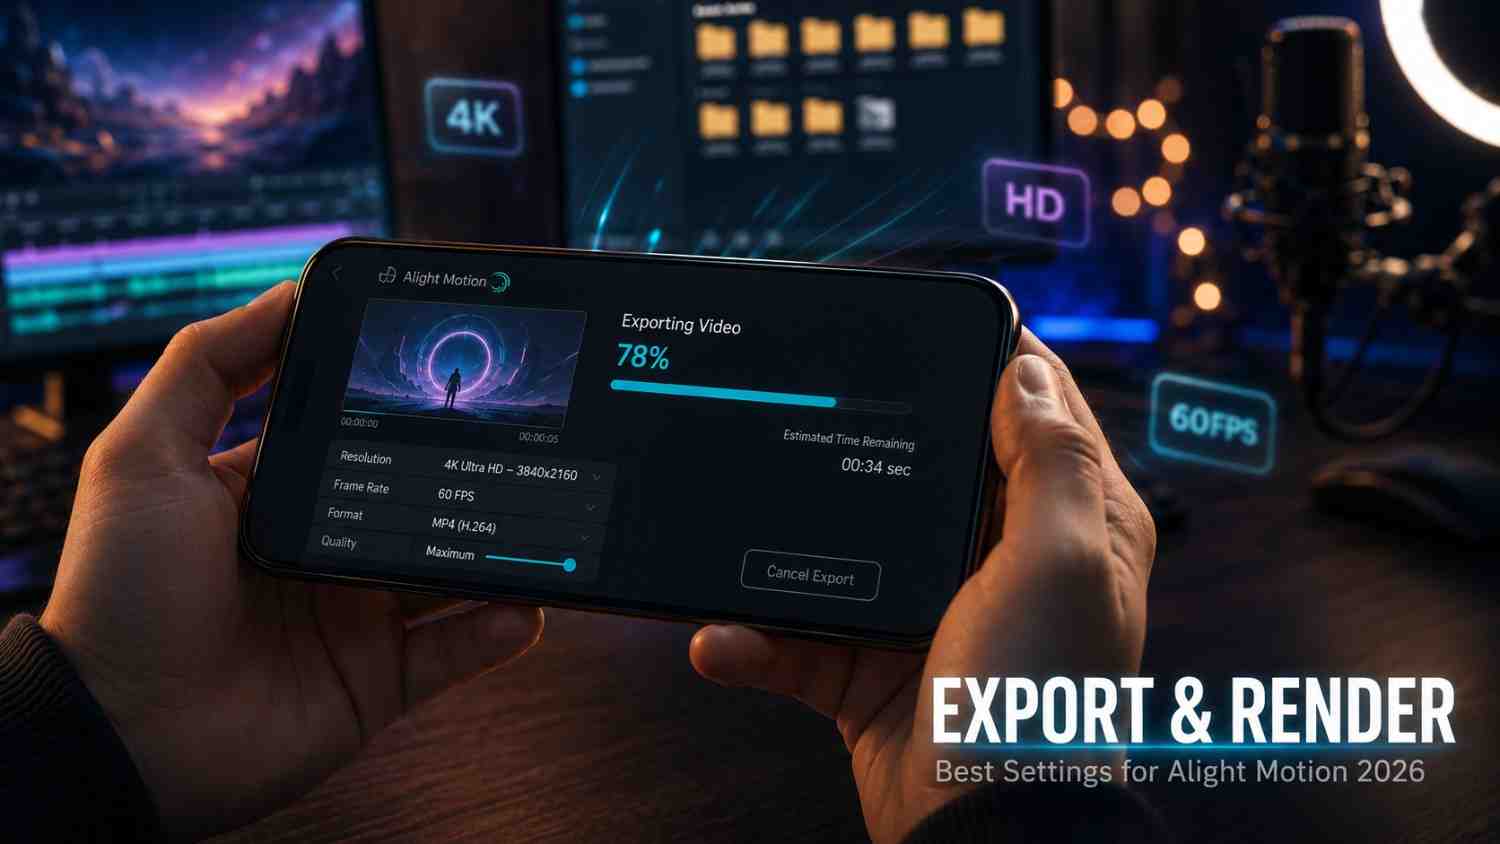
Bitrate controls how much data per second goes into your video. Higher bitrate equals better quality and larger file size. For 1080p, 20 Mbps is my standard. For 4K, I go up to 40 Mbps or more.
Step 6: Enable Advanced Export Options
Inside advanced settings, you can choose codec, color profile, and other technical parameters. H.264 is the universal compatible codec. HEVC offers smaller files at similar quality but with less device support.
Step 7: Start Rendering the Video
Tap the start button to begin rendering. Depending on project complexity and device performance, this can take a few seconds to several minutes. Keep your phone plugged in for long renders to avoid battery drain.
Step 8: Save and Share the Final Export
Once rendering finishes, you can save the file to your gallery, share directly to social platforms, or move it to cloud storage. I always save a local backup before uploading anywhere.
Best Export Settings in Alight Motion
After exporting hundreds of projects, these are the settings I trust as my defaults. Adjust based on your specific project, but start here.
Recommended Resolution Settings
For most social content, 1080p is the sweet spot. It looks great on phones, uploads quickly, and is supported everywhere. Use 4K only when you need future-proofing or working with high-detail footage. 720p should only be used when storage is genuinely a problem.
Best FPS for Smooth Videos
60 fps is my default for anything with motion graphics, 3D Effects in Alight Motion or camera-driven shots. Smooth motion needs higher frame rates to look natural. For talking-head content or static shots, 30 fps works fine and saves storage.
Choosing the Right Bitrate
For 1080p, target 18 to 25 Mbps. For 4K, aim for 35 to 50 Mbps. For 720p, 8 to 12 Mbps is enough. Lower bitrates produce visible compression artifacts, especially on detailed shots with motion blur or particle effects.
Best Codec Settings
H.264 is universal and plays everywhere. HEVC, also called H.265, produces smaller files at similar quality but is not supported on older devices. For client work, stick with H.264. For personal storage where you control playback, HEVC saves space.
Balancing File Size and Video Quality
Higher bitrate equals better quality but bigger files. Aim for the highest bitrate your storage and upload speed can handle. Heavy compression below recommended levels damages the smooth motion and detail you worked hard to create.
Best Export Settings for Different Platforms
Each platform compresses uploaded videos differently. These settings give you the best chance of survival through their compression.
Best Settings for YouTube Videos
Resolution 1080p or 4K, frame rate 30 or 60 fps, bitrate 20 to 50 Mbps depending on resolution, MP4 format with H.264 codec. For HDR or premium content, push bitrate as high as your phone allows.
Best Export Settings for TikTok
1080×1920 resolution, 60 fps, MP4 with H.264, bitrate around 20 Mbps. TikTok aggressively compresses uploads, so starting with high quality gives you the best chance of a sharp final result.
Instagram Reels Export Settings
1080×1920 resolution, 60 fps for smooth motion graphics, MP4 with H.264 codec, bitrate around 20 to 25 Mbps. Instagram’s compression is harsh, so always export at the highest reasonable quality.
Export Settings for Facebook and Shorts
Facebook and YouTube Shorts share similar requirements. 1080×1920 vertical, 60 fps, MP4 with H.264, bitrate 18 to 25 Mbps. These settings consistently produce uploads that look clean after platform processing.
Recommended Aspect Ratios for Social Media
Use 16:9 for traditional YouTube, 9:16 for Reels, Shorts, and TikTok, 1:1 for older Instagram posts, and 4:5 for Instagram feed video. Always set the aspect ratio at the start of your project, not at export.
Advanced Export and Rendering Settings in Alight Motion
These are the deeper settings most beginners ignore but professionals use to squeeze maximum quality out of every export.

Hardware Acceleration
If your phone supports hardware-accelerated encoding, enable it in advanced settings. Hardware acceleration uses your phone’s GPU to speed up rendering, sometimes cutting export time in half on complex projects.
High-Quality Rendering Options
Some versions of Alight Motion offer a high-quality rendering toggle. Enable it for hero shots, client deliveries, or anything that needs maximum fidelity. Expect longer export times in exchange for cleaner output.
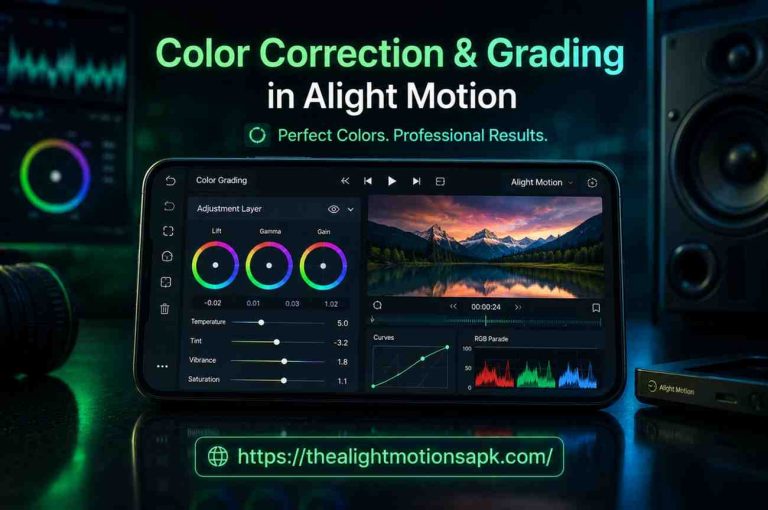
Color and Compression Settings
Standard sRGB color is the safe choice for social media. If you have done color grading, ensure your export color profile matches what you graded in. Mismatched profiles produce washed-out or oversaturated final videos.
Motion Blur Rendering
Motion blur added to Camera Objects in Alight Motion or fast-moving layers requires sufficient bitrate to render cleanly. Below 15 Mbps at 1080p, motion blur often turns into muddy compression artifacts.
Exporting 4K and HD Videos
4K export requires a device with strong specs, at least 6 GB of RAM and enough free storage. Expect significantly longer render times. Always plug your phone in for 4K exports to avoid thermal throttling.
Rendering Heavy Projects Smoothly
Heavy projects with multiple effects, many layers, or 3D elements need patience. Close background apps, free up storage, and avoid using the phone for anything else during render. Interruptions can corrupt the output file.
Exporting VFX and Special Effects in Alight Motion
VFX-heavy projects need special care during export. Here is what I have learned from rendering hundreds of effects-heavy edits.
Exporting Videos with Motion Blur
Motion blur eats bitrate. Set your export bitrate to the upper end of the recommended range for your resolution. At 1080p with heavy motion blur, target 25 Mbps minimum to preserve the smooth blur instead of seeing it turn into noise.
Rendering Particle and Glow Effects
Particle systems and glow effects produce fine detail that compression destroys easily. Use higher bitrates and stick with H.264 for maximum compatibility. Always preview the exported file before delivering or uploading.
Best Settings for Cinematic Effects
Cinematic edits with color grading, light leaks, and depth effects deserve premium export settings. 1080p at 25 Mbps or 4K at 50 Mbps preserves the cinematic quality you worked hard to create.
Exporting 3D and Camera Animations
Projects using Camera Objects in Alight Motionand 3D-style motion need 60 fps minimum to feel smooth. Lower frame rates make camera moves feel choppy and break the cinematic illusion.
Maintaining Effects Quality After Export
Always preview your exported file at full size before considering the job done. Phone screens hide compression issues that become obvious on bigger displays. Spotting problems before delivery saves you from awkward client revisions.
Common Export Problems in Alight Motion
I have hit every one of these problems myself. Here is what causes them and how to recognize each one.
Export Stuck or Freezing
This usually happens on complex projects with too many layers or effects, or when your phone is running low on RAM. Background apps eating memory are often the hidden culprit.
Video Quality Loss After Export
Quality loss typically comes from low bitrate settings or wrong codec choices. Exporting at 720p with 5 Mbps will look pixelated no matter how perfect your edit was.
Audio Not Syncing Properly
Audio sync issues sometimes appear in long projects, especially after many edits. Frame rate mismatches between source audio and export settings are a common cause.
Lag During Rendering
Lag during render is your phone struggling to process the workload. Closing other apps, lowering preview quality during editing, and using simpler effects help significantly.
Export Failed Error
Export failures usually happen when storage runs out mid-render, the app crashes, or thermal throttling kicks in. Check storage first, then restart and try again.
Black Screen After Export
A black screen output usually means a corrupted layer, incompatible codec, or interrupted render. Try exporting a shorter test section to isolate the problem.
How to Fix Export and Rendering Issues?
These solutions handle the vast majority of export problems I have run into over the years.
Clear Cache and Free Storage
Open your phone’s storage settings and clear Alight Motion’s cache. Also ensure you have at least 2 GB of free storage before exporting. Tight storage causes more export failures than any other issue.
Lower Resolution for Heavy Projects
If 4K export fails repeatedly, drop to 1080p. Most viewers cannot tell the difference on phone screens anyway. Reliability matters more than maximum resolution on mid-range devices.
Update Alight Motion to the Latest Version
Many export bugs get fixed in updates. Check the Play Store or App Store for the latest version before troubleshooting deeper. A two-minute update sometimes solves issues that look mysterious otherwise.
Reduce Unnecessary Effects and Layers
Heavy projects with unused effects waste rendering power. Remove anything not visible in the final output. Simpler timelines export faster and crash less.
Restart the Rendering Process
Sometimes a simple restart fixes everything. Force-close Alight Motion, reopen it, and try the export again. This solves more issues than you would expect.
Optimize Device Performance
Close all background apps, disable battery saver mode, and plug in your charger. Phones in low-power mode throttle their performance, which can corrupt or slow down exports significantly.
Tips for Faster Rendering in Alight Motion
Long renders test patience. These tips have cut my average export time noticeably over the years.
Keep Projects Organized
Well-organized projects with Layer Parenting & Null Objects in Alight Motion render faster because the app processes a cleaner hierarchy. Disorganized timelines force the engine to work harder.
Avoid Overusing Effects
Stacking five effects on every layer eats rendering time. Choose the minimum effects that achieve your look. Restraint is also visually more professional.
Use Recommended FPS Settings
60 fps doubles the work compared to 30 fps. Use 60 only when motion truly benefits from it. Static content at 30 fps renders much faster without visible quality loss.
Close Background Apps Before Export
Every background app steals RAM and processing power. Swipe them away before tapping export. Free resources directly translate to faster renders.
Export in Smaller Sections for Large Projects
If a long project fails to export, split it into sections, export each separately, and combine them later. This is sometimes the only way to finish a massive project on a mid-range phone.
Best Rendering Practices for Professional Results
These habits separate professional exports from amateur ones. They take seconds to follow and save countless headaches.
Use High-Resolution Media Files
Source files at 1080p or 4K give the app room to work without producing pixelation. Low-resolution sources look worse, not better, after export, especially when scaled up.
Maintain Consistent Frame Rates
If your project is set to 60 fps, source clips should also be 60 fps when possible. Mismatched frame rates cause subtle stutter that becomes obvious after export.
Preview Videos Before Exporting
Play through the full timeline at high preview quality before tapping export. Catching issues in preview saves the long render time that finding them post-export costs.
Match Export Settings with Platform Requirements
Each platform has recommended specs. Following them avoids unnecessary platform compression. Uploading at the right resolution and bitrate is one of the simplest ways to maintain quality.
Test Quality Before Final Upload
Always watch the final exported file before uploading. Mobile previews hide issues. Watching on a larger screen or sending to yourself first reveals problems that would otherwise embarrass you.
How File Size Affects Export Quality?
File size and quality have a direct relationship. Understanding this trade-off helps you make smart decisions.
Understanding Compression
Compression reduces file size by removing data the eye supposedly does not notice. Too much compression introduces visible artifacts, blocky shadows, and motion smearing. Quality video needs enough data to preserve detail.
Large File vs Small File Quality
A large file has more data per second, which means more detail and smoother motion. Small files compress more aggressively, losing detail in the process. There is no free lunch with compression.
Choosing the Right Balance
Match your file size goal to your purpose. Cloud storage and archives benefit from larger files. Quick messaging and chat sharing tolerate smaller files. Social media uploads should always lean toward larger files because platforms compress them again.
Reducing File Size Without Losing Quality
Switch to HEVC codec for the biggest reduction with minimal quality loss. Lower frame rate from 60 to 30 fps for static content. Trim unused clip sections. These adjustments shrink files significantly without hurting the visible quality.
Recommended Device Requirements for Smooth Rendering
Hardware matters. Here are the device specs I recommend based on real experience exporting from different phones.
RAM and Storage Requirements
6 GB of RAM is the practical minimum for serious work. 8 GB or more handles complex projects with effects like Masking Feature in Alight Motion and motion blur smoothly. Keep at least 5 GB of free storage to avoid mid-export failures.
Processor Performance for Video Rendering
Modern Snapdragon, MediaTek Dimensity, or Apple A-series chips handle Alight Motion comfortably. Older processors can still run the app, but expect longer render times and occasional crashes on heavy projects.
GPU Acceleration Benefits
Phones with strong GPUs render significantly faster, especially when hardware acceleration is enabled. The Adreno and Mali series on Android, and Apple GPUs on iOS, all support smooth Alight Motion exports.
Best Practices for Mid-Range Devices
On mid-range phones, keep projects under fifteen active layers, avoid 4K export, and limit motion blur. These adjustments make the difference between reliable exports and constant crashes.
FAQ‘s
What is the best export setting in Alight Motion?
For most social media content, the best export setting is 1080p resolution, 60 fps, MP4 format with H.264 codec, and bitrate of 20 Mbps. These settings produce sharp, smooth videos that survive platform compression while keeping file sizes manageable.
Why does my export fail in Alight Motion?
Export failures usually happen due to low storage, insufficient RAM, app crashes, or thermal throttling on heavy projects. Free up storage, close background apps, plug in your charger, and try a lower resolution if failures continue.
Which FPS is best for smooth video editing?
60 fps is best for motion graphics, gaming clips, AMVs, and cinematic edits with smooth camera motion. 30 fps is fine for talking-head content, tutorials, and static-shot videos. Higher frame rates always look smoother but increase file size.
How do I reduce video size without losing quality?
Use HEVC codec instead of H.264 for smaller files at similar quality. Lower frame rate from 60 to 30 fps for static content. Optimize bitrate carefully rather than dropping resolution. These changes shrink files without hurting visible quality.
Can Alight Motion export 4K videos?
Yes, Alight Motion supports 4K export on devices with sufficient processing power and RAM. Premium users gain access to higher-quality 4K export, while the free version may have limitations depending on your device and version of the app.
Why is my rendered video blurry?
Blurry exports usually come from low bitrate settings, low-resolution source media, or excessive compression. Increase bitrate to recommended levels, use higher-quality source footage, and verify your resolution matches your project settings.
How can I speed up rendering in Alight Motion?
Close background apps, free up storage, enable hardware acceleration if available, reduce unnecessary effects, and use 30 fps instead of 60 fps when smooth motion is not critical. These steps significantly cut render time on most devices.
Does the free version of Alight Motion add a watermark?
Yes, the free version adds a small watermark to exported videos. Upgrading to premium removes the watermark, unlocks higher export resolutions, and gives access to additional features. The free version still produces solid quality for personal projects.
Final Thoughts
Looking back, learning to use the exporting and rendering options in Alight Motion properly was one of the biggest quality jumps in my mobile editing career. The same edit can look professional or amateur depending entirely on how you export it. Today, I treat export settings with the same care I treat the edit itself, and the difference shows in every client deliverable.
Start by adopting the recommended settings for your most-used platform, then experiment from there. Keep notes on what works for your device and your style. Within a few weeks of intentional practice, choosing the right export settings becomes automatic. The crashes, blurry results, and failed exports stop happening because you understand what each setting actually does.