Masking Feature in Alight Motion | Complete Beginner to Pro Guide (2026)
I still remember the first time I tried to make a clean text-reveal intro for a client’s YouTube channel. I spent nearly two hours trying to hide and unhide parts of a video using clumsy workarounds, and the result still looked amateur. That same night, a fellow editor sent me a five-minute walkthrough on the masking feature in Alight Motion. Within twenty minutes of learning it, I had recreated the exact effect I had been struggling with, and it looked broadcast-ready.
Masking is honestly one of those tools that separates beginner edits from edits that actually get hired. Once you understand it, you start seeing it everywhere, in Instagram Reels, Netflix intros, music videos, gaming montages, and even product ads. The good news is that the masking feature in Alight Motion gives you most of what desktop software offers, packed into a phone app you can carry in your pocket.
This guide is built from three years of using this app daily for client work, AMV edits, and social media content. I will walk you through what masking is, every mask type Alight Motion offers, the exact step-by-step process I use, and the creative techniques that took my edits from forgettable to scroll-stopping. Beginners, social media editors, and even seasoned video editors switching to mobile will find practical value here.
What Is the Masking Feature in Alight Motion?
Before we open the app, let me explain what masking actually does and why it matters so much for modern mobile editing.
Understanding Masking in Video Editing
A mask is essentially a shaped window. It tells the editor which part of a layer to show and which part to hide. Imagine cutting out a star shape from a piece of paper and holding it over a photograph. You only see the photo through the star. That is masking in its simplest form, except in video, the window can be any shape, animated over time, feathered at the edges, or even tracked to follow moving subjects.
How Masks Work in Alight Motion?
Inside Alight Motion, masks live as properties on individual layers. You select a layer, open the mask tools, and draw the area you want to keep visible. Everything outside the mask becomes invisible. You can adjust the shape, soften the edges, and animate the mask using keyframes, all without leaving the layer’s properties panel.
Difference Between Basic Editing and Masking
Basic editing tools like cropping or trimming affect the entire frame or timeline. Masking is selective and non-destructive. You can hide part of a clip without actually cutting it, change the masked area later, and even animate the boundary. This flexibility is what makes the masking feature in Alight Motion so powerful for creative work.
Why Masking Is Popular Among Content Creators
Creators love masking because it unlocks effects that look expensive but cost nothing extra to produce. Logo reveals, text peeking from behind objects, smooth scene transitions, and the famous clone effect where one person appears twice in the same shot, are all built on masks. Once you learn it, you stop relying on stock templates and start creating your own signature style.

Types of Masks in Alight Motion
Alight Motion offers several mask types, and knowing which one to reach for saves time. Here is what each does in plain language.
Shape Masks
Shape masks are the most common type, built from preset geometric forms. They are perfect for quick highlights, vignettes, and basic reveals. Most of my edits start with a shape mask before I move to something more complex.
Rectangle and Circle Masks
These are your everyday workhorses. Rectangle masks are great for split-screen effects, banner reveals, and framing horizontal compositions. Circle masks suit portraits, spotlight effects, and round logo reveals. I use circle masks at least three times a week on client work.
Freehand or Pen Tool Masks
The pen tool lets you draw custom mask paths point by point. This is what you use when you need to isolate an irregular shape, like cutting around a person, an animal, or a complex object. It takes practice but offers the most precision.
Text Masks
Text masks use letters as the visible window. The video plays inside the shape of your text, creating that cinematic look where words seem to contain motion footage. This is probably my favorite effect for opening titles and brand intros.
Image and Layer Masks
Image masks use one layer to define the visible area of another. This is how you create logo-shaped reveals or composite multiple layers together for advanced effects. Once you grasp this concept, an entire universe of creative options opens up.
Alpha Masks
Alpha masks rely on transparency information. The transparent parts of your mask layer become invisible in the masked layer, while the opaque parts stay visible. This is the technique used for clean logo cutouts and detailed reveals.
Luma Masks
Luma masks work based on brightness values. Bright areas stay visible while dark areas get hidden, or vice versa. These are perfect for atmospheric effects, light leaks, and blending two clips with natural-looking edges.
Clipping Masks
A clipping mask uses the shape of one layer to clip the content of the layer above it. This is useful when you want to apply effects to only part of a complex layer setup without affecting the rest.
Animated Masks
Any of the above mask types can become animated by adding keyframes. The mask’s shape, position, size, or feather can change over time, creating reveals, sweeps, wipes, and tracking effects. Animated masks are where the real cinematic magic happens.
Why Use the Masking Feature in Alight Motion?
If you are still wondering whether masking is worth your time, here are the reasons I push every student I mentor to learn it within their first month.
Create Cinematic Video Effects
Masks turn ordinary footage into cinematic moments. A smooth mask reveal can make a basic shot feel like a movie trailer scene. Once you master it, your edits stop looking like phone videos and start looking like productions.
Hide or Reveal Specific Parts of a Video
Want to hide a logo on a background object, blur a face for privacy, or reveal something gradually? Masking handles all of these without ruining the original footage. This level of control is why professional editors use masks on nearly every project.
Improve Visual Storytelling
Stories need pacing and focus. Masks let you direct the viewer’s eye exactly where you want it, whether by highlighting a subject with a spotlight mask or revealing details one at a time. Storytelling becomes intentional rather than accidental.
Make Professional Reels and Shorts
Short-form content lives and dies on the first three seconds. A clean mask reveal in the opening frame is one of the most effective hooks I have ever used. My own reels with mask-based intros consistently outperform ones with static openings.
Add Creative Transitions and Motion Effects
Mask transitions like sweeps, wipes, and shape-based reveals replace boring cuts with engaging visual flow. They are also significantly more polished than the default Alight Motion Templates everyone else is using on CapCut and similar apps.
Tools You Need Before Creating Masks
Before you start masking, get comfortable with these supporting tools inside Alight Motion. Trying to mask without them is like cooking without knowing where your spices are.
Layer Panel
Every mask belongs to a layer, so the layer panel is home base. Get used to selecting, reordering, duplicating, and grouping layers quickly. Most of my masking time is actually spent organizing layers.
Keyframe Animation
Keyframes are how you bring masks to life. Set a starting value, jump forward in the timeline, change the value, and Alight Motion animates the transition. Without keyframes, your masks stay static.
Blend Modes
Blend modes change how masked layers interact with layers underneath. Screen, Multiply, and Add modes are especially useful when combining masks with lighting and color effects.
Feather and Opacity Controls
Feather softens the edge of a mask, making the transition between visible and invisible areas smooth instead of harsh. Opacity controls overall transparency. Together they fix the most common amateur mistake, which is hard, jagged mask edges.
Transform and Motion Tools
Position, scale, and rotation tools let you move and resize masked layers without breaking the mask. Understanding how these interact with masks is what allows you to build complex animated scenes.
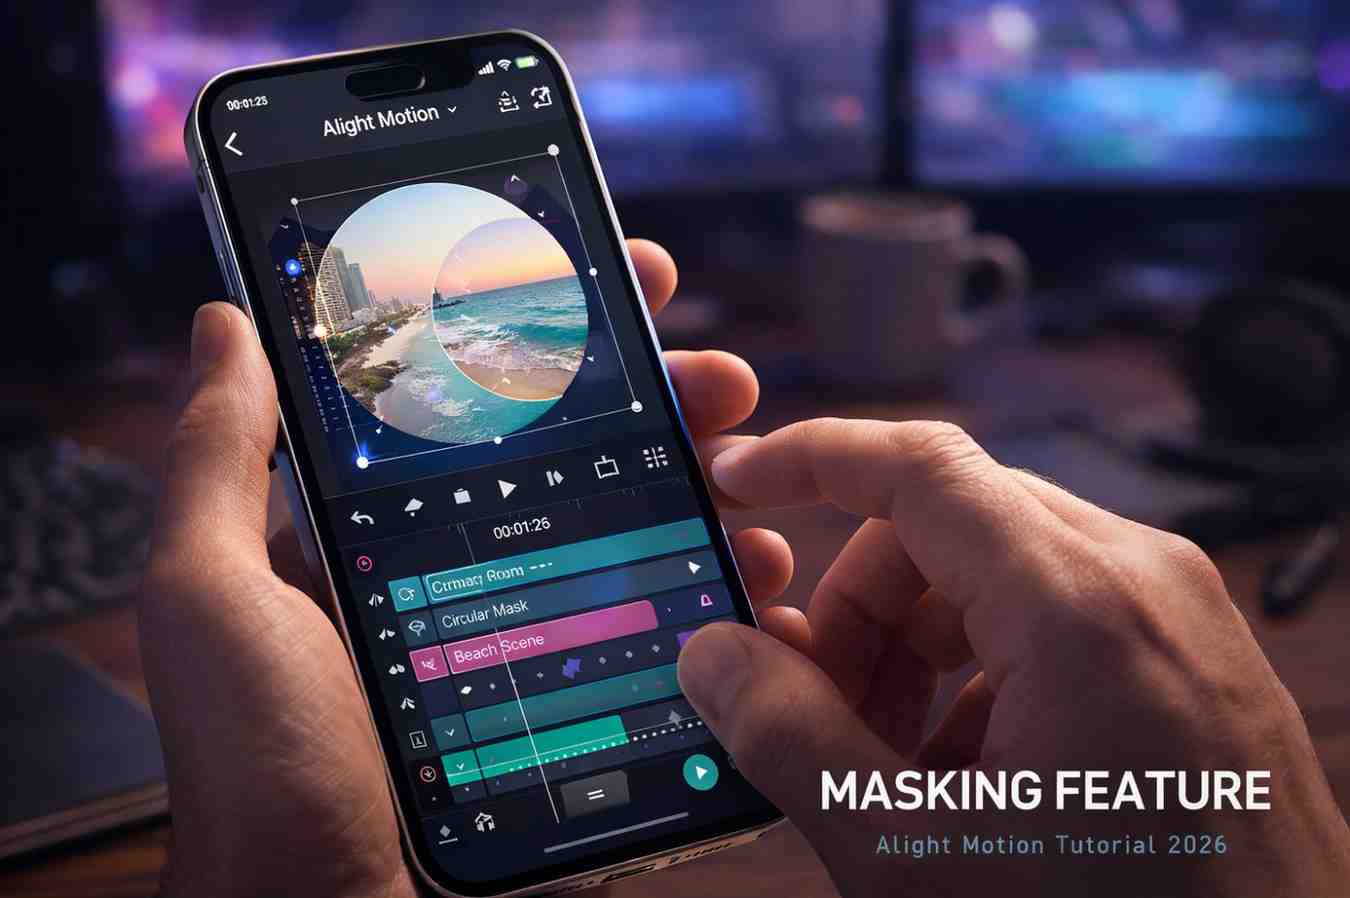
How to Do Masking in Alight Motion (Step-by-Step)
Here is the exact process I follow on every project. Open the app on your phone and follow along.
Step 1: Create or Open a Project
Tap the plus icon to start a new project. Choose your aspect ratio based on the platform, 9:16 for Reels and Shorts, 16:9 for YouTube. Set the frame rate to 60 fps for smoother mask animations.
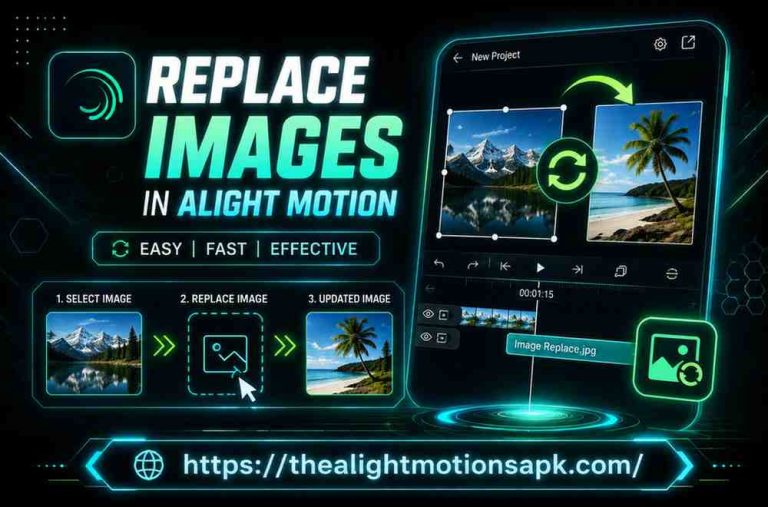
Step 2: Import Photos or Video Clips
Add the media you want to mask using the add media button. For your first attempt, start with a single video clip or a high-resolution photo. Complex multi-layer projects are easier once you understand the basics.
Step 3: Select the Layer You Want to Mask
Tap the layer in the timeline. A blue outline confirms selection. Masks are layer-specific, so picking the right layer here matters.
Step 4: Open the Masking Tool
Open the layer’s properties panel and look for the Masks section. Tap to expand it. This is where you control everything related to masking on this layer.
Step 5: Choose the Mask Type
Pick a shape mask, freehand mask, or any other type that matches your goal. For a first attempt, start with a rectangle or circle. You can always change the type later.
Step 6: Draw the Initial Mask Shape
Use your finger to draw the mask boundary on the preview screen. Do not worry about perfection yet. You will refine the shape in the next step.
Step 7: Adjust and Refine the Mask
Drag the handles to resize the mask. Move it into the right position by holding and sliding. Zoom in on the preview to check the edges carefully, especially around important visual elements.
Step 8: Use Feather for Smooth Edges
Tap the feather slider and increase the value slightly, usually between five and fifteen pixels. This softens the boundary and makes the mask blend naturally with the surrounding footage. Avoid extreme feather values, they often look unnatural.
Step 9: Animate the Mask Using Keyframes
Add a keyframe at the start of the timeline on the mask’s position or path. Move the playhead forward and change the mask. Alight Motion animates the change. This is how you create reveals, sweeps, and motion-tracked masks.
Step 10: Preview and Export the Final Video
Play the timeline and check the animation. Refine any rough edges or timing issues. When you are happy, tap export, choose 1080p or higher, and set the bitrate to at least 20 Mbps for crisp results.
How to Animate Masks in Alight Motion?
Animated masks are where edits transform from static to cinematic, and even when you Import XML File in Alight Motion, these are the techniques I use most often on paid projects.
Using Keyframes for Smooth Animation
Always pair keyframes with easing curves. Linear motion feels robotic, while ease-in-out makes mask animations feel organic. Inside the keyframe editor, drag the curve handles into an S-shape for natural acceleration and deceleration.
Creating Moving Reveal Effects
Place a mask at one end of your subject and animate it to cover the entire frame. This sweep reveal is the foundation of most cinematic intros. Adjust timing to about one to two seconds for the best impact.
Tracking Motion with Masks
If your subject moves across the frame, animate the mask’s position to follow it. Alight Motion does not have automatic tracking like After Effects, but with practice, manual keyframing produces excellent results.
Making Dynamic Transitions
Use an animated mask to wipe one clip out and reveal the next. A diagonal mask sweep across two clips creates a transition that looks far more professional than a basic crossfade.
Controlling Animation Speed and Timing
Timing controls the entire feel of your edit. Faster mask animations feel energetic and modern, while slower ones feel cinematic and moody. Match the pace to your music or narration for the best emotional impact.
Advanced Masking Techniques in Alight Motion
Once the basics feel comfortable, these techniques will take your edits into truly professional territory.
Multi-Layer Masking
Stack multiple masks across different layers to build complex composite scenes. A landscape with a person, a sky replacement, and a foreground prop can all be combined using separate masks on each layer.
Combining Masks with Motion Blur
Add motion blur to a moving masked layer, and the animation gains realistic weight. This single trick separates amateur edits from broadcast-quality ones. Use blur sparingly, only on fast-moving elements.
Using Masks for Cinematic Zoom Effects
Combine a mask with a slow scale animation to create a Hitchcock-style zoom, where the subject stays in focus while the background shifts. This effect is incredibly powerful for emotional moments.
Background Replacement Techniques
Mask out the original background of your subject and place a new one underneath. This is how creators put themselves inside fantasy environments, beachfronts, or studios without ever leaving home.
Creating Double Exposure Effects
Overlay two clips and use a luma mask to blend their bright and dark areas. The result is the artistic double exposure you see in music videos and high-end commercials.
Combining 2D and 3D Visual Effects
Masks pair beautifully with 3D rotation and parallax. A masked subject inside a parallax background creates depth that looks cinematic. I use this combination in nearly every premium client edit.
Using Masks for Color Correction and Effects
Masks are not just for hiding and revealing. They are also one of the most powerful color grading tools in Alight Motion.
Selective Color Adjustment
Place a mask around a specific subject and apply color correction only to that area. A red dress can become more vibrant without affecting the rest of the frame. This is the same technique used in fashion editorial videos.
Highlighting Specific Areas
Increase brightness inside a soft circular mask to draw attention to your subject. This subtle effect works wonders on portraits and product shots.
Adding Glow and Lighting Effects
A masked glow effect placed behind a subject creates that magical halo lighting you see in cinematic shots. Pair it with a soft feather and low opacity for the best results.
Blur Background While Keeping Subject Sharp
Mask out your subject, then apply Gaussian Blur to the background layer behind them. This depth-of-field trick instantly makes phone footage look like it was shot on professional cameras.
Creating Shadow and Depth Effects
Use masks to add custom shadows in specific areas of the frame. Realistic shadows ground your subjects and add depth that flat lighting cannot achieve.
How to Use Masking for Text and Titles
Text masking creates some of the most eye-catching effects in modern video editing. Here is how I approach it on title sequences.
Text Reveal Animation
Animate a mask to slide across your text, revealing each letter as it passes. Use easing curves for smooth motion. This effect works great for movie-style title sequences.
Creating Moving Title Effects
Combine a text mask with a moving video background. The footage plays inside the letters as if they are windows. Pick bold, geometric fonts like Bebas Neue or Anton for the strongest visual impact.
Using Text Inside Video Masks
Reverse the technique by masking out the text shape from a video, leaving the rest of the frame visible. This creates a hollow text effect that is perfect for intro reveals.
Cinematic Intro Animations
Pair masked text with subtle camera shake, motion blur, and a glow effect. The combination produces openings that feel like they belong on a streaming platform rather than a phone screen.
Best Uses of Masking in Social Media Content
Social platforms reward content that stops the scroll. Masking is one of the most reliable tools for doing exactly that.
Instagram Reels Editing
Mask-based hooks in the first second of a Reel can double watch time. I tested this on my own account last quarter and saw consistent retention boosts.
TikTok Transition Effects
Masked transitions between scenes feel native to TikTok’s visual language. They are also harder to recreate than basic cuts, which gives your content an edge.
YouTube Shorts Animations
Use masking for clean logo reveals at the start of every Short. Brand consistency through animated openings builds recognition over time.
Gaming and AMV Edits
The AMV community relies heavily on creative masks for beat-synced reveals and dramatic transitions. Alight Motion is a favorite tool in this space for good reason.
Product Promotion Videos
Mask reveals of products create that premium unboxing feel. Small businesses pay well for these styles of ads, which is one of the easiest niches to enter as a freelancer.
Common Masking Mistakes to Avoid
I made every one of these mistakes during my first year. Save yourself the trouble.
Rough or Jagged Edges
Sharp edges around a mask reveal the trick immediately. Always feather slightly to blend the boundary naturally with the surrounding image.
Incorrect Mask Alignment
A misaligned mask can shift between frames and look unprofessional. Zoom in during keyframe placement and double-check alignment at the start, middle, and end of the animation.
Overusing Feather Effects
Too much feather softens the mask into mush. Keep feather values between five and twenty pixels for most cases. Heavy feathering should be intentional, not a default fix.
Too Many Keyframes
Excessive keyframes slow playback and make masks jittery. Use the minimum number of keyframes needed to achieve the animation you want.
Low-Quality Video Assets
Masks magnify the quality of your source footage. Pixelated or grainy clips look worse, not better, when masked. Always start with the highest resolution material available.
Unnatural Motion and Timing
Mask animations that move too fast or too uniformly feel robotic. Apply easing and vary speeds to match real-world motion.
Tips for Professional Masking Results
These are the habits that took my own work from decent to consistently impressive.
Keep Mask Edges Smooth
Use light feathering on almost every mask. Even one or two pixels of softness can dramatically improve the final look.
Use High-Resolution Media
Source assets from sites like Pexels, Unsplash, or your own 4K phone recordings. Higher resolution gives you room to scale and reposition masks without losing quality.
Match Lighting and Colors
If you mask a subject onto a new background, the lighting and color temperature must match. Mismatched lighting kills the illusion instantly.
Keep Animations Natural
Reference how things move in the real world. Acceleration, deceleration, and slight overshoots make mask animations feel organic rather than mechanical.
Organize Layers Properly
Name your layers and group related ones together. Future you, after a long export, will thank present you for the organization.
Preview Frequently While Editing
Do not wait until the end to play through your timeline. Preview after every major adjustment. Small issues are easier to fix immediately than to track down later.
Troubleshooting Masking Problems in Alight Motion
Even the best workflows hit problems. Here are the most common ones and how I fix them.
Why the Mask Is Not Working
Check that you selected the right layer before drawing the mask. Also, confirm the mask mode is set to add rather than subtract if you want the inside visible.
Fixing Lag During Mask Animation
Lower the preview quality during editing and close background apps. Lag is usually caused by too many high-resolution layers running simultaneously.
Solving Export Issues
If your mask animation looks fine in preview but exports incorrectly, try a different export resolution or restart the app. Stubborn issues usually clear after a fresh restart.
How to Reduce App Crashes
Limit each project to under fifteen active layers when possible, and keep at least 2 GB of free storage on your phone. Crashes drop significantly with these basic optimizations.
Fixing Blurry or Pixelated Masks
Pixelation often comes from low-resolution source media or excessive scaling. Use original 1080p or 4K assets, and avoid scaling layers above 150 percent of their original size.
Advantages and Limitations of the Masking Feature
Benefits of Using Masks in Alight Motion
The masking feature in Alight Motion brings desktop-level capabilities to mobile editing. You get multiple mask types, animation support, blend modes, and feather control inside a phone app, which was unimaginable for mobile editors even five years ago.
Limitations of Mobile Masking Tools
There is no automatic motion tracking like After Effects offers, so complex tracked masks require manual keyframing. Very complex multi-mask projects can also slow down older devices, especially those with under 6 GB of RAM.
When to Use Simple vs Advanced Masks
For quick social posts, stick with shape masks and simple animations. For client work, brand intros, and showcase reels, invest the extra time in pen tool masks, multi-layer compositions, and luma masks. Pick the right complexity for the project.
Best Export Settings for Masking Projects
Recommended Resolution and FPS
Export at 1080p minimum, 60 fps for smooth mask animations. If your phone supports it, 4K at 60 fps gives the cleanest results for high-end client work.
Export Settings for Reels and Shorts
Use 1080×1920 resolution, 60 fps, MP4 format with H.264 codec, and bitrate set to 20 Mbps or higher. These settings preserve mask edges and animation smoothness across platforms.
Reducing File Size Without Losing Quality
Lower the bitrate slightly to 15 Mbps if file size matters, but never go below that for mask-heavy projects. Heavy compression destroys feathered edges and produces visible artifacts.
Best Format for Social Media Uploads
MP4 with H.264 is the universal choice. It works flawlessly on Instagram, TikTok, YouTube, and Facebook. Avoid MOV unless you have a specific reason to use it.
Frequently Asked Questions About Masking in Alight Motion
What is masking in Alight Motion?
Masking is a feature that lets you hide or reveal specific parts of a layer using a defined shape. Inside Alight Motion, masks can be shapes, freehand paths, text, or even other layers, and they can be animated using keyframes for dynamic reveals and transitions.
How do you add a mask in Alight Motion?
Select your layer, open the properties panel, find the Masks section, choose a mask type, and draw the shape on the preview screen. Refine the shape, adjust the feather, and add keyframes if you want to animate it.
Which mask type is best for beginners?
Shape masks, especially rectangles and circles, are easiest to start with. They give you predictable results while you build comfort with the mask tools. Once you are confident, move to pen tool and text masks.
Can I animate masks in Alight Motion?
Yes, all mask properties including position, size, shape, and feather can be animated with keyframes. Animated masks are the foundation of cinematic reveals, transitions, and tracking effects.
Why is my mask not aligning correctly?
Misalignment usually happens when the mask is drawn on the wrong layer or when keyframes have shifted between scenes. Zoom in, check your layer selection, and verify alignment at the start, middle, and end of your animation.
How do I create smooth mask edges?
Use the feather slider with values between five and fifteen pixels. This softens the boundary and blends the mask naturally with surrounding footage. Avoid feather values above thirty pixels unless you want a deliberately blurred edge.
Is masking available in the free version of Alight Motion?
Yes, the masking feature is available in the free version, along with most of the core tools you need to learn and create. Premium adds higher export resolutions, watermark removal, and access to additional effects packs.
Can masking replace green screen editing?
For many use cases, yes. Pen tool masks and luma masks can isolate subjects from their backgrounds without needing a physical green screen. The process takes longer than chroma keying but produces clean results when done carefully.
Final Thoughts
Looking back, learning the masking feature in Alight Motion Pro was the single biggest jump in my editing skills. It transformed how I think about every shot, every transition, and every title sequence. Today, I rarely deliver a client project without using masks somewhere in the edit, and that is the level of integration I hope you reach too.
Start small. Pick one mask type, maybe a simple shape or text mask, and use it on your next project. Once you feel comfortable, add keyframes and start animating. Within a month of consistent practice, your work will look noticeably more professional, and you will start seeing creative opportunities everywhere.
Masking is one of those features that rewards curiosity. The more you experiment, the more you discover. If this guide helped you, share it with another editor still relying on basic cuts and overlays. There is no reason to stay stuck on flat edits when this much creative power sits right inside the app on your phone.