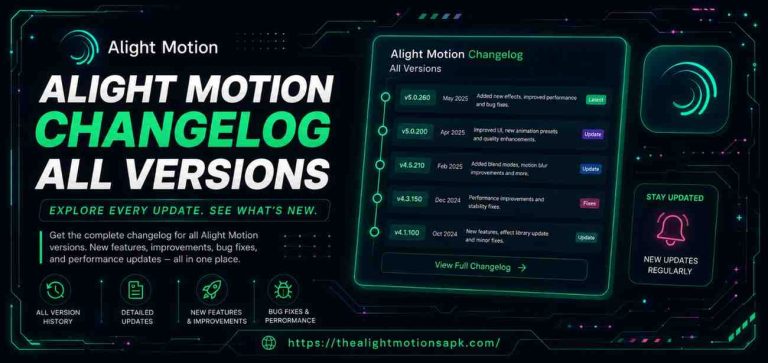
How to Add, Trim, Split, and Delete Clips in Alight Motion? (Complete Beginner-to-Pro Guide)
Let me be honest with you the first time I opened Alight Motion Mod APK, I had no idea what I was doing. I imported a clip, accidentally moved it to the wrong spot, tried to trim it, and ended up deleting the whole thing. Sound familiar? You are not alone.
After spending months editing everything from YouTube Shorts to Instagram Reels and full motion graphics projects inside Alight Motion, I finally have a solid grip on exactly how clip editing works in this app. And in this guide, I am going to walk you through every single step how to add clips, trim them cleanly, split them at the right moment, and delete what you do not need with real examples from things I have actually done inside the app.
Whether you are editing your first video or you have been at it for a while but still feel unsure about a few things, this guide covers it all from the ground up.
Understanding Clip Editing in Alight Motion
What Are Video Clips in Alight Motion?
In Alight Motion, a video clip is any media file video footage, an image, or an audio track that you place on the timeline. Each piece of media sits on its own separate track, and you can stack multiple tracks on top of each other to build complex, layered edits.
Think of the timeline like a cutting table in a film editing room. Each clip is a piece of footage you are laying out in a specific sequence. The beauty of Alight Motion compared to many basic mobile editors is that every layer works independently. You can trim one clip without accidentally touching another. That kind of control is what makes it powerful, especially when you are working on projects with four, five, or even ten layers at once.
Trim vs Split vs Delete vs Crop Key Differences
One of the most common sources of confusion for beginners is not knowing which tool does what. Here is a clear breakdown:
| Action | What It Does |
| Trim | Shortens a clip by cutting from the start or end like cutting the edges off a photo |
| Split | Divides one clip into two separate pieces at a point you choose like cutting a ribbon in the middle |
| Delete | Removes the clip entirely from the timeline |
| Crop | Changes the visible frame area of the video this is spatial, not time-based |
People constantly mix up trimming and splitting. Trimming removes the beginning or end of a clip. Splitting cuts the clip at a point in the middle, giving you two separate pieces you can work with independently. Both are useful just for different situations.
Why Clip Editing Is Important for Smooth Video Projects
Here is something I learned the hard way: raw footage almost always has extra seconds at the beginning before the action starts, or a few dead moments at the end after it finishes. If you leave those in, your final video feels slow and sloppy even if the actual content is great.
Clean clip editing precise trimming, smart splitting, removing unused layers is what separates a polished video from an amateurish one. Viewers notice it, even if they cannot explain why. The video just feels tighter and more professional. Every serious creator, even those working entirely on mobile, pays close attention to clean timelines.
Things to Do Before Editing Clips
Alight Motion App and Device Requirements
Before you start editing, make sure your device and app are ready:
- Android: Version 5.0 or higher, minimum 3GB RAM recommended for smooth playback
- iOS: iPhone 6s or later, running iOS 12 or above
- Storage: Keep at least 1-2GB of free space for project files and exports
- App version: Always use the latest official version from the Google Play Store or Apple App Store
If you are on an older phone, close all background apps before you start editing. Nothing is more frustrating than the app lagging right when you are trying to make a precise frame-level cut.
Setting Up Your Project and Timeline
When you first open Alight Motion, tap the “+” icon on the home screen to create a new project. You will be asked to configure a few settings:
- Frame rate: 24fps for a cinematic feel, 30fps for standard video, 60fps for smooth motion content
- Resolution: 1080×1920 for vertical content like Reels and TikTok, 1920×1080 for YouTube landscape videos
- Duration: Set an approximate length you can always change this later
Choose settings that match where your final video is going to be published. For Instagram Reels or TikTok, 1080×1920 at 30fps is the standard. For YouTube, go with 1920×1080.
Importing Video Clips into the Timeline
Once your project is open, you will see the timeline panel at the bottom of the screen. To bring in your footage, tap the “+” button inside the timeline area, then select “Video” from the media picker. Navigate to your phone gallery, choose the clip you want, and it will drop directly onto the timeline as a new layer.
A small but important habit: import clips one by one. Each clip gets its own dedicated track, which makes it much easier to manage, move, and edit later without messing up other layers.
Essential Editing Tools in Alight Motion
Before jumping into the actual steps, it helps to know where these tools live and what they do. I wasted a lot of time in my early days hunting for buttons that were right in front of me.
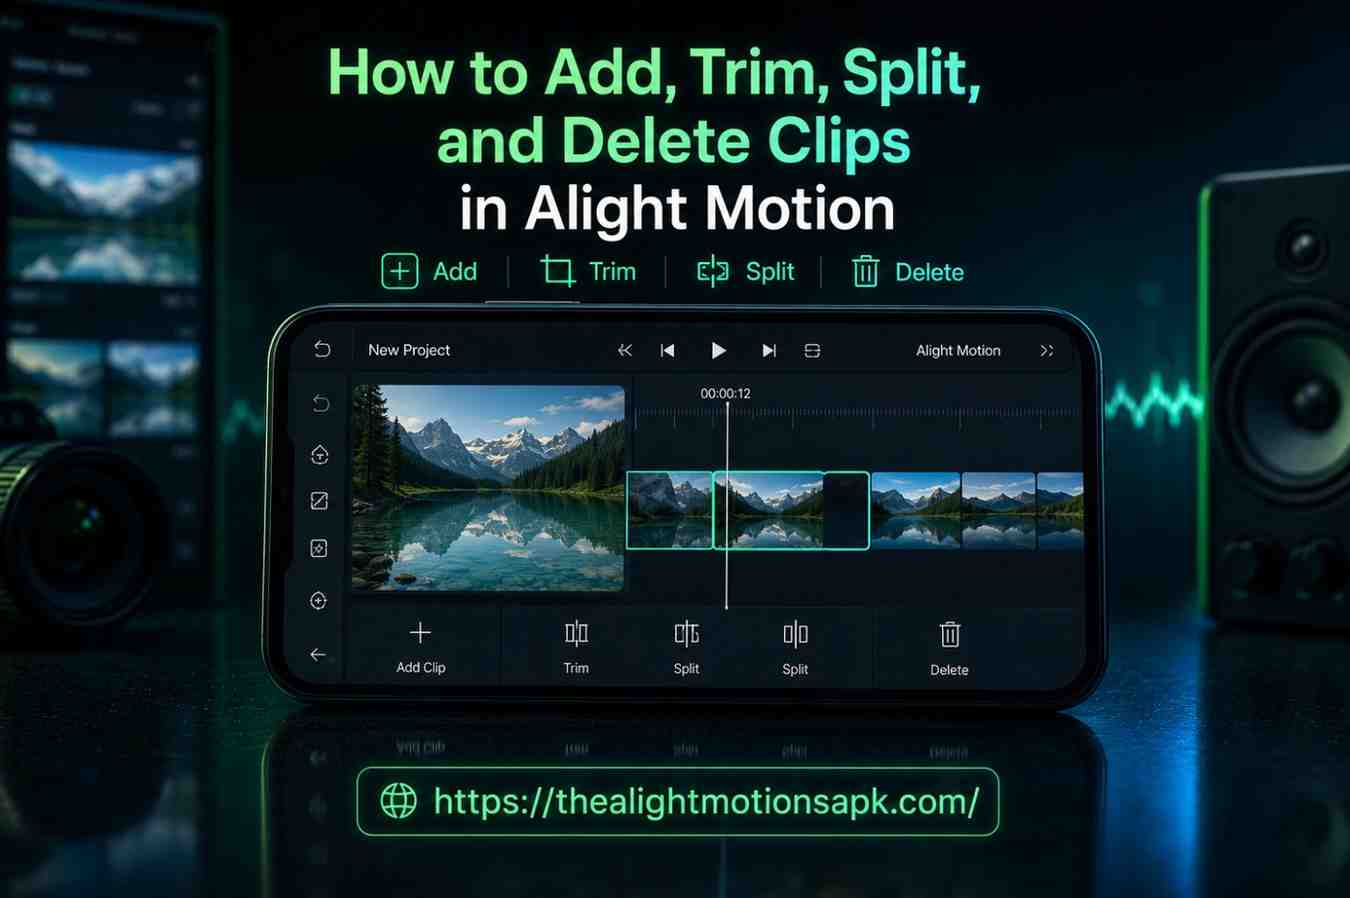
Timeline and Layer Controls
The timeline is the horizontal panel at the bottom of your screen. Each clip appears as a colored bar. The length of the bar represents the clip’s duration. Tap any bar once to select it you will see a highlight or blue outline appear around it when it is active.
Playhead and Frame Navigation
The playhead is the thin vertical line that moves across the timeline as your video plays. It shows exactly where you are in the video at any given moment. You can drag it manually to jump to any specific point. This is especially important when you want to split a clip at a precise moment.
Timeline Zoom for Precise Editing
Pinch outward on the timeline with two fingers to zoom in. This spreads out the timeline so that each individual frame takes up more visual space, making it far easier to make precise cuts and trims. I use this feature constantly it is one of the most underrated tools in the whole app.
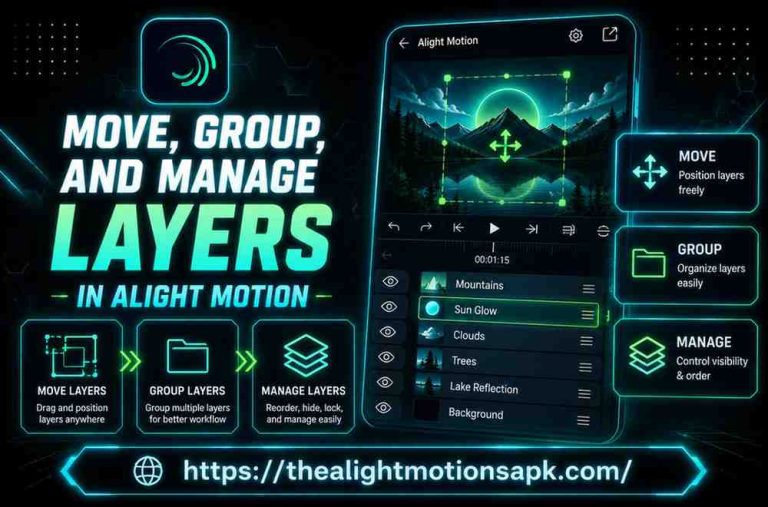
Selecting and Managing Layers
To select a layer, simply tap on it in the timeline. To move it, press and hold, then drag. Layers stack visually whichever layer sits higher in the panel appears on top in the preview window. You can reorder them by pressing and holding, then dragging up or down in the layer list.
How to Add Clips in Alight Motion? (Step-by-Step)
Create a New Project
Open Alight Motion and tap the large “+” on the home screen. Give your project a clear, recognizable name especially important if you tend to have multiple projects open at once. Set your canvas size and frame rate based on where the video will be published, then tap to enter the editor.
Import Videos and Images
Once inside your project, look at the bottom panel. Tap “+” in the layers or timeline section. A menu appears with several options: Video, Image, Audio, Text, and Shape. Tap “Video” to open your device gallery and select the footage you want to work with.
Practical example: If you are making a 30-second product review reel, import your main talking-head clip first, then add the b-roll footage afterward. Keeping them in separate layers makes it easy to adjust their timing independently.
Add Clips to the Timeline
After selecting a video from your gallery, it automatically appears on the timeline as a new layer. You will see it as a colored bar in the layers panel. The length of the bar corresponds to the clip’s full duration. Tap it once to select it.
Arrange Layers and Clip Order
In Alight Motion, the top layer in the panel is visually on top in the preview. To change the order, press and hold a layer, then drag it up or down. If you want clip A to play before clip B in a sequential edit, place them on separate tracks and offset their start points on the timeline so they do not overlap.
How to Trim Clips in Alight Motion? (Step-by-Step)
Trimming is something I do in every single project, without exception. It is the very first thing I do after importing clean up the start and end before touching anything else.
Select the Clip on the Timeline
Tap the clip in the timeline. Once selected, you will see small handles appear at both ends of the clip bar these look like vertical lines or small arrows on the left and right edges. These are your trim handles.
Adjust the Start and End Points
Drag the left handle inward to trim the beginning of the clip. Drag the right handle inward to trim the end. As you drag, the preview window at the top of the screen updates in real time so you can see exactly where your cut is happening.
Go slowly here. If you trim too much, you can simply drag the handle back out nothing is permanently lost as long as you have not exported the project. The original source footage is always recoverable during editing.
Preview the Trimmed Clip
After adjusting the handles, tap play to preview that section of the video. Watch through the clip once fully before moving on. This single habit always previewing before continuing saves a lot of time. Many beginners trim, assume it looks fine, and only notice the mistake after a full export.
Save the Changes
Alight Motion saves your trim changes automatically as you drag. There is no separate “confirm trim” button. Your changes apply to the project in real time. Once you tap outside the clip to deselect it, your trim is locked in.
Advanced Trimming Techniques
Frame-Accurate Trimming
For the most precise trimming, use the timeline zoom feature. Pinch outward with two fingers to zoom in on the timeline. Now when you drag the trim handles, you are working at individual frame level rather than large chunks of time. This is essential when you want a cut to land on a specific beat in a music track or right at the peak of a motion.
Trimming Multiple Layers in Sync
If your project has both a video layer and an audio layer that need to stay perfectly aligned, trim them together. Select one layer, trim it, then immediately select the other layer and trim it to match. Some creators group layers first before trimming this keeps everything aligned and prevents sync issues later.
Trimming Audio and Video Separately
Sometimes you want the video to cut slightly before the audio, or vice versa. In Alight Motion, since every layer is independent, you can trim them separately. Select the video layer, trim it, then select the audio layer and trim it differently. This technique is used in professional editing to create “L-cuts” and “J-cuts” where the audio from the next scene starts before the visual cut, or continues after it.
Maintaining Video Quality After Trimming
Trimming does not affect video quality in Alight Motion. You are not re-encoding the footage during editing you are simply adjusting which portion of the clip plays. Quality is only affected at export time, based on the settings you choose when exporting. Always export at the highest resolution your platform supports.
How to Split Clips in Alight Motion?
Splitting is one of my most-used tools when editing Reels and short-form content. Once you understand it, you will use it constantly.
Move the Playhead to the Split Point
Drag the playhead the thin vertical line on the timeline to the exact point where you want to cut the clip. Use the frame-by-frame scrubbing and timeline zoom to get it perfectly positioned. The preview window will show you the exact frame your playhead is sitting on.
Select the Clip Layer
Tap the clip you want to split in the timeline. Make sure it is highlighted and active. If the clip is not selected when you try to split, the tool will not function properly this is one of the most common beginner mistakes.
Use the Split Tool
With the clip selected and the playhead in the right position, look for the split option in the editing toolbar. In most versions of Alight Motion, this appears as a scissors icon or a “Split” button in the clip editing menu. Tap it, and the clip immediately divides into two separate pieces at the playhead position.
Edit Each Segment Independently
After splitting, you now have two independent clips on the same track. You can trim, move, apply effects, or delete either one without affecting the other. This is incredibly powerful for example, you can split a clip, delete the middle section, and then slide the two remaining pieces together to remove an unwanted pause or mistake.
Creative Uses of Splitting Clips
Removing Unwanted Sections
This is the most common use. Say you have a 60-second clip but there is a 5-second pause in the middle where you lost your train of thought. Split the clip right before the pause and right after it, then delete the middle section and slide the two remaining clips together. The result is a seamless cut that the viewer will not even notice.
Creating Highlight Videos
If you have long gameplay footage, an event recording, or a vlog, splitting is how you extract only the best moments. Split out the highlights, keep what you want, delete the rest, and arrange the segments in whatever order works best for the story you are telling.
Preparing Clips for Effects and Transitions
Splits are essential when you want to apply a specific effect to only one portion of a clip. Split the clip at the exact frames where the effect should start and end, then apply the effect only to that isolated segment. This gives you surgical control over your edit.
Editing YouTube Shorts, TikTok, and Instagram Reels
Short-form content is almost entirely built on splitting. You want every cut to be tight and intentional. I personally split every clip down to the tightest possible version before adding any music or transitions. The rhythm of the cuts is what makes short content feel energetic and engaging.
Adding New Elements Between Clips
After splitting a clip, the gap between the two segments is a perfect space to insert a title card, a reaction clip, a graphic, or a sound effect. Split, create a gap, insert what you want, and you have a clean layered moment in your edit.
How to Delete Clips in Alight Motion?
Delete a Single Clip from the Timeline
Tap the clip in the timeline to select it. Once selected, look for the delete icon (usually a trash can symbol) in the editing options or at the top of the screen. Tap it, and the clip is removed from your timeline. The layer disappears entirely.
Always double-check before deleting. Tap the clip once to confirm which one is actually selected before you hit delete. It is very easy to select the wrong layer, especially when you have multiple overlapping clips.
Remove Multiple Clips at Once
If you want to delete several clips at once, select them one by one while holding down the multi-select option (available in newer versions of Alight Motion), then delete the entire selection. If multi-select is not available in your version, delete them individually.
Clean Up Unused Layers
After finishing a project, it is good practice to scroll through your layers and delete anything that is not being used blank layers, test clips, or audio tracks you decided against. Unused layers increase your project file size and can cause performance issues during playback and export.
Restore Changes Using Undo Option
If you accidentally delete a clip, immediately tap the undo button (usually an arrow icon at the top of the screen) to restore it. Alight Motion supports multiple undo steps, so you can go back several actions if needed. Make it a habit: delete, then verify in the preview that you deleted the right thing, and only move on when you are sure.
Pro Tips for Faster and Better Clip Editing
Organize Layers for a Smooth Workflow
Rename your layers using descriptive names like “Main Clip,” “B-Roll 1,” “Background Music,” or “Title Text.” In a busy project with ten or more layers, named layers save enormous amounts of time because you can identify what you need instantly without guessing.
Use Timeline Zoom for Precision
I already mentioned this, but it is worth emphasizing again. Any time you need to make a precise cut frame-level trimming, split on a beat, exact transition point zoom into the timeline first. Working at full zoom on a long clip makes it almost impossible to be accurate.
Keep Backup Copies of Important Clips
Before making major edits to a project, duplicate it. Tap and hold the project on the home screen, then select “Duplicate.” This takes two seconds and has saved me multiple times when I went too far with an edit and wanted to start fresh from an earlier version.
Preview Every Edit Before Exporting
This is non-negotiable. Before you export, play through the entire project from start to finish at least once. Look specifically at every cut point do the trims feel right? Are the splits landing in the right place? Is everything in sync? One full preview pass prevents embarrassing mistakes from reaching your final export.
Common Mistakes to Avoid When Editing Clips
Accidentally Trimming Important Footage
This happens when you drag a trim handle too far without watching the preview. The fix: always watch the preview window while trimming, not just the timeline bar. The visual feedback in the preview tells you exactly what you are cutting.
Misplacing the Playhead While Splitting
If your playhead is in the wrong position when you tap split, your clip divides in the wrong place. Before splitting, zoom into the timeline, scrub the playhead precisely to the right frame, confirm it in the preview window, then split. Never split on assumption.
Deleting Clips Without Backup
Deleting is permanent once you close the project (undo history clears). Always keep a duplicate project as backup before doing major deletions. For professional work, also keep original source files in a separate folder on your device.
Ignoring Layer Organization
When you have eight layers and none of them are named or organized, editing becomes chaotic. Take thirty seconds to name and group your layers when you start a project. It feels tedious at first but pays off enormously on complex edits.
Troubleshooting Clip Editing Problems
Clip Not Trimming or Splitting Properly
If the trim handles are not responding or the split is not working, the clip is probably not selected. Tap the clip in the timeline and confirm the highlight appears around it, then try again.
Layer Lock Issues
If you cannot move or edit a clip, check whether the layer is locked. In Alight Motion, you can lock individual layers to prevent accidental editing. Look for a lock icon next to the layer name and tap it to unlock.
Tool Selection Errors
Make sure you are in the right editing mode. Some actions, like using the split tool, require you to be in the timeline editing mode rather than the effects or keyframe mode. If the tool is not showing up, check which mode you are currently in.
App Lag and Performance Problems
If the app is lagging during playback or while scrubbing, try these fixes: close background apps, reduce the preview resolution temporarily, clear Alight Motion’s cache from your phone settings, or restart the app. Heavy projects with many layers naturally require more processing power.
Updating or Reinstalling Alight Motion
If trimming or splitting consistently fails across multiple projects, the app may have a bug in your current version. Check the Play Store or App Store for available updates. If issues persist after updating, uninstall the app, clear all cached data, and reinstall fresh. Your saved projects are stored separately and should not be affected.
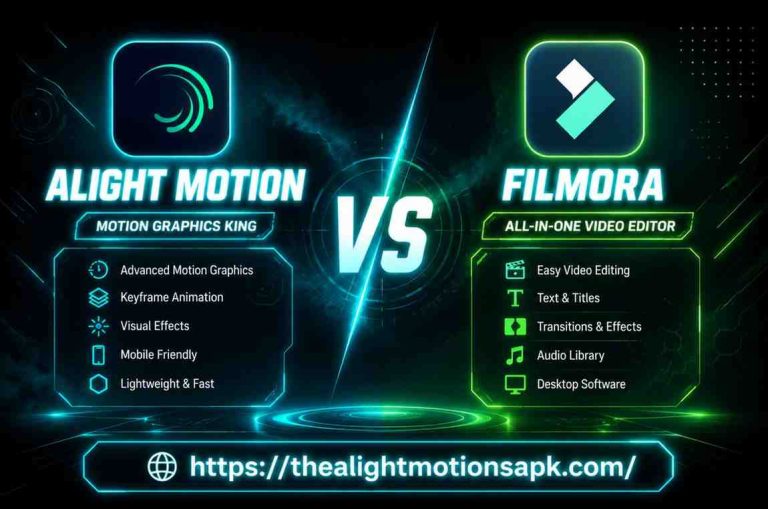
Alight Motion vs Other Mobile Video Editors
Comparing Clip Editing Features
| Feature | Alight Motion | CapCut | InShot | KineMaster |
| Frame-accurate trimming | ✅ Yes | ✅ Yes | Limited | ✅ Yes |
| Multi-layer splitting | ✅ Yes | Limited | ❌ No | ✅ Yes |
| Independent audio/video trim | ✅ Yes | ✅ Yes | ❌ No | ✅ Yes |
| Keyframe control with clips | ✅ Yes | Limited | ❌ No | ✅ Yes |
| Free tier available | ✅ Yes | ✅ Yes | ✅ Yes | Limited |
Why Many Creators Prefer Alight Motion
Alight Motion sits in a unique position it offers desktop-level features like keyframe animation, multi-layer editing, and vector support inside a mobile app. For creators who edit primarily on Android or iPhone, it gives a level of precision and creative control that most competitors simply do not match. Once you learn the timeline properly, editing in Alight Motion feels remarkably close to editing in a full desktop software.
Quick Workflow to Edit Clips in Minutes
When you have a project to finish and limited time, follow this sequence:
Add Clips
Open your project, tap the “+” in the timeline, import all your clips one by one, and arrange them roughly in order.
Trim Unwanted Parts
Go through each clip and trim any dead footage from the beginning and end. Work from the first clip to the last, zooming into the timeline for precision.
Split the Video into Sections
Use the playhead and split tool to divide clips wherever you need separate control for effect zones, transition points, or removing middle sections.
Delete Unnecessary Segments
Remove everything that does not add value. Tap, confirm the selection, delete, and clean up any empty layers left behind.
Export the Final Video
Once everything looks clean in the preview, go to the export settings. Choose your resolution, quality, and format, then export. Always preview the exported file before uploading it anywhere.
Best Practices for Professional Video Editing
Keep Clips Organized on the Timeline
From the very start of a project, name your layers. Use a logical order background layers at the bottom, main video in the middle, text and graphics on top. This structure makes it much faster to find and edit specific elements.
Maintain Consistent Video Quality
B Throughout your edit, make sure all your clips are from compatible resolutions and frame rates. Mixing 4K and 1080p clips, or 30fps and 60fps clips, on the same timeline can cause syncing and playback issues. Stick to one standard for the whole project.
Use Keyframes with Split Clips
One powerful technique: split a clip right before a motion or effect change, then apply a keyframe animation to only that isolated segment. For example, split the clip at the exact moment you want a zoom-in to start, then apply a scale keyframe only to that short segment. The result is a very precise, controlled animation.
Save Projects Regularly
While Alight Motion auto-saves, it is still a good habit to manually save and exit a project periodically during long editing sessions especially on older devices where the app is more prone to crashing. You do not want to lose an hour of work to an unexpected app crash.
FAQ‘s
How Do I Add a New Clip in Alight Motion?
Tap the “+” button inside the timeline panel while your project is open. Select “Video” from the media type options, browse your gallery, and tap the clip you want. It will appear automatically as a new layer on the timeline.
How Do I Remove the Middle Part of a Video?
Place the playhead right before the unwanted section and split the clip. Then move the playhead to right after the unwanted section and split again. Now select the middle segment, tap delete, and slide the two remaining clips together. The middle part is cleanly removed.
Can I Trim Multiple Clips at the Same Time?
Alight Motion does not currently have a batch trim feature. You need to trim each clip individually. However, by working in an organized layer structure and using timeline zoom, you can move through multiple clips quickly.
Does Trimming Reduce Video Quality?
No. Trimming in Alight Motion does not re-encode the footage during editing. The original quality is preserved throughout the editing process. Quality settings only apply at export time, and you have full control over those.
Why Is My Split Tool Not Working?
The most common reason is that the clip is not selected. Tap the clip in the timeline first and confirm the selection highlight appears, then try splitting again. Also check that you are not in a locked mode or an effects panel view.
Can Deleted Clips Be Recovered?
Yes, but only within the same editing session. Tap the undo button immediately after deleting to restore a clip. Once you close the project or clear the undo history, deleted clips cannot be recovered from within the app. This is why keeping a duplicated backup project is so important.
What Is the Difference Between Trimming and Splitting?
Trimming removes footage from the beginning or end of a single clip. Splitting divides one clip into two independent pieces at a point you choose. Use trimming to shorten a clip’s edges. Use splitting to cut a clip in the middle and work with the pieces separately.
Final Thoughts
Clip editing in Alight Motion IOS adding, trimming, splitting, and deleting is the foundation that everything else builds on. Get these four things right, and the rest of your editing workflow becomes significantly smoother and faster.
The tools are not complicated once you understand what each one actually does and when to use it. Start with clean imports, trim first before adding any effects, split precisely using the timeline zoom, and keep your layers organized throughout. That is honestly the entire workflow right there.
If you found this guide helpful, bookmark it and come back to it whenever you run into a specific step that is giving you trouble. And if you have a question not covered here, drop it in the comments I read them all.